
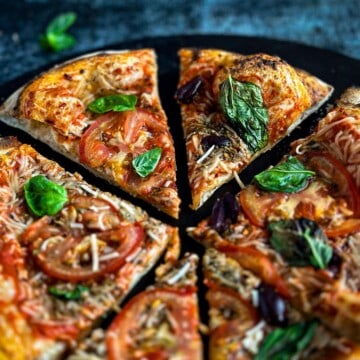
Ciao, pizza lovers! I am thrilled to share my recipe that dives into the heart of traditional Italian pizza. This Neapolitan pizza recipe uses a 100% Biga starter and takes about 24 hours, but it's worth the wait.

This Neapolitan pizza dough holds a special place in my heart-and my stomach.
For about 15 years, we've made pizza every Saturday for family movie night. This tradition has seen our pizza dough evolve from "good" to "wow!" and I can honestly say it's now the best pizza dough you'll ever taste. Trust me, even our dog licks his lips when he smells it baking!
The experience of crafting and indulging in this pizza dough and its Neapolitan Pizza Sauce Recipe will rival the best pizzas you've ever had, and the satisfaction of having made it yourself will be the cherry (or olive?) on top.
Jump to:
What is Neapolitan Pizza?
Well, Neapolitan Pizza is the Ferrari of pizzas.
With a rich history, strict regulations, and incredible crust options, Neapolitan pizza is not just a food; it's a testament to the Italians' relentless pursuit of perfection and authenticity.

")
Ingredients
Here are the ingredients you'll need to create this vegan biga Neapolitan pizza dough.
For an extra touch, we've included a simple but delicious sauce recipe and simple toppings that pair perfectly with this dough, but of course, you can use what you love on your pizza.
Check the recipe card for exact quantities.
Biga
- 1000 grams "00" Caputo Pizzeria Flour
- 540 grams water
- 2 grams active yeast
Pizza Dough
- All the biga
- 110 grams of very cold water
- 22 grams salt
- 22 grams diastatic malt
Neapolitan Pizza Sauce
- You can find more details on how to make this Neapolitan Pizza Sauce
- 1 can (400 grams) San Marzano Tomatoes
- 1 tablespoon salt
- 1 tablespoon chopped garlic
- 6 fresh basil leaves
- 1 tablespoon olive oil
Toppings
- Vegan Parmesan cheese from a wedge for best flavor
- Fresh basil leaves
- Extra virgin olive oil for drizzling
- Salt to taste
Italian herb seasoning (optional)
How To Make 100% Biga Pizza Dough
Part 1: Make the Biga Pre-Fermented Dough
The first step is the pre-fermented dough. This will need to rest for about 12-14 hours until it doubles in size.

Step 1: Combine yeast and water.

Step 2: Then, mix until the yeast dissolves.

Step 3: Add flour to the proofing tray.

Step 4: Make sure to spread the flour evenly across the tray.

Step 5: Add the water/yeast mixture to the proofing tray.

Step 6: Then, lightly combine with your fingers.
Important! DO NOT kneed the dough - you're going for a disconnected stringy consistency resembling loose noodles.

Step 7: Continue mixing until all the dry flour parts are incorporated - this is key as you don't want dry bits remaining in the mixture.

Step 8: Manually pull apart any larger pieces to unlock moisture that can be used to moisten the smaller dry bits.

Step 9: Place the loose mix into a bowl or vertical container. DO NOT leave the mixture in a wide container like the proofing tray to rest. Confining the dough in something more narrow will help it to continue combing over the resting period.

Step 10: Then, cover the bowl with plastic wrap or a tightly fitting damp towel and rest for 12-14 hours until biga doubles in size.
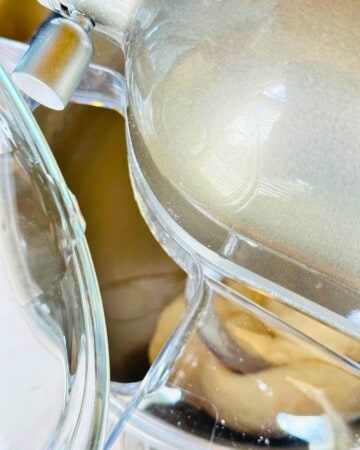
After resting, Biga will have a wonderful aromatic quality with small air bubbles and a somewhat dense consistency.

Part 2: Make the Pizza Dough
The second part is about making the dough.

Step 1: Combine water and salt, stirring until all the salt is dissolved.

Step 2: Then, place biga into the stand mixer with a spiral dough hook attachment.

Step 3: Turn the mixer on the speed setting of one.

Step 4: Slowly add the water and salt mixture in very small increments just until the bottom of the bowl is wet.
Once the dough absorbs the water at the bottom of the bowl, repeat the process until all the water/salt mixture is incorporated into the dough. This will take some time.

Step 5: Slowly add the malt, letting it combine into the dough gradually - DO NOT add all the malt at once.

Step 6: Then, add the chilled water and continue mixing until you have a silky and fully combined dough.

Step 7: Remove the mixing bowl, cover it with plastic wrap or a tightly fitting damp towel, and rest for 2 hours at room temperature.
")
Step 8: After 2 hours of resting at room temperature, move the bowl to the refrigerator to cold rest for another 2 hours.
Part 3: Form the Dough Balls
Part three consists of forming the dough balls. These will rest for about 4 hours.
Remove the dough from the refrigerator and rest at room temperature for 15 minutes to let it soften.
Then, weigh 320-gram portions shaped into tightly kneaded balls, place them into a clean proofing tray, and seal them tightly. You should have 5 pizza balls.

Step 1: Weigh the dough and divide by how many balls you want.

Step 2: Make the balls into smooth shapes.

Step 3: Let the balls rest in the tightly sealed container for 4 hours.
Part 4: (Optional) Make the Pizza Sauce
While the balls rest, make this super easy and delicious pizza sauce. This can also be made in advance since it stores well.

The traditional Neapolitan sauce is another crucial element that deserves attention. It is a simple sauce perfect for traditional Neapolitan pizza.
Our recipe will bring you as close as possible to the sunny landscapes of Naples. Made from San Marzano tomatoes, grown in the volcanic soil of Mount Vesuvius along with other simple ingredients, it brings a distinctively bright and sweet flavor.
This is our favorite way of making this simple sauce.
Combine one can of tomatoes, olive oil, salt, fresh basil, and salt in a blender and mix to desired consistency, usually about a minute. Set aside.
Part 5: Make the Pizzas!
You're almost there! This is where all your patience and hard work pay off. Take your time, enjoy the process, and be prepared for the best pizza you've ever had!
Remove pizza balls one at a time after 4 hours in the proofing tray.
After your dough has risen, you'll want to handle it gently to keep those nice air bubbles inside.

Step 1: Gently use a spatula to separate the balls from each other and the walls of the proofing tray before sliding the spatula underneath the ball.

Step 2: Instead of using a rolling pin, dust the dough ball with flour.

Step 3: Then, use your fingertips to gently press and stretch the dough from the center outwards, leaving the edge a little thicker to create the crust.

Step 4: If you're careful and patient, pushing the dough out evenly without tearing or squishing it, you'll create an airy and light crust once it is baked.
")
Step 5: Dress your pizza with a sauce, or use your own, as well as the Parmesan cheese, garlic, and fresh basil.

Step 6: Gently slide, not lift, the pizza onto the pizza peel and give the peel a gentle shake (forward and backward) to ensure it is not sticking to the peel.
Part 6: Baking in Ooni Pizza Oven
Transfer the pizza to the pizza oven for 1-2 minutes, rotating ¼ turn as the edges start to brown.

Once the pizza is browned, remove the pizza using the peel, garnish with any additional topping as desired, slice to your liking, and enjoy!

Alternative Cooking Method
Baking in a Home Oven
Preheat the oven to 500 °F with the pizza stone or plate inside for at least 30 minutes.
Then, transfer the pizza to the oven for ~ 10 minutes. Check pizza after 7 minutes for progress and continue monitoring until cooked. Cooking time will vary based on several factors, so keep an eye on it until you're happy with the browning level.
Once the pizza is browned, remove the pizza using the peel, garnish with any additional topping as desired, slice to your liking, and enjoy!

Top Tip
Whether you're using a home oven or a powerful Ooni pizza oven, it's key to allow enough time for the pizza stone or a pizza plate to warm up sufficiently for at least 30 minutes. Do not skip this step, or your crust will not reach the desired level of crispy and will be chewy.
Substitutions
- There are so many ways to make this biga pizza your own, honestly, it's hard to go wrong with any variety. That said, here are some ideas to inspire your pizza dough creativity.
- Fresh Vegan Mozzarella Cheese - I know this sounds pretty simple, but this would be off the table for those looking to stay close to the authentic Neapolitan pizza dough recipe.
- That said, it's a family favorite. In fact, we often do a blend of both the vegan fresh mozzarella cheese and vegan parmigiana, how could you go wrong?
- Fresh Yeast - Many people, like me, have difficulty sourcing fresh yeast, so I use active dry yeast in this recipe. While the amounts required for each approach are different (much less for the fresh yeast), use it if you can find fresh yeast!
- Bread Flour or All-Purpose Flour - These are solid options if you can't source "00" pizza flour. Remember that if you're using an Ooni pizza oven, turn down the temperature, as it will ignite these flours almost immediately. A regular oven will be perfect for these Neapolitan pizza dough recipe substitutions.
Variations
- We love traditional toppings for our family pizza night, veganized, of course, but everyone has their twist on what makes the perfect Neapolitan pizza recipe. As many purists will note, these are clear departures from the classic Neapolitan pizza, and that's okay for those looking to mix it up a little or ease newcomers to this amazing homemade pizza. Here are some ideas for pizza toppings for you to consider:
- Spicy Red Pepper Flakes - Add chili pepper flakes while cooking to imbue heat into the dish, adding a bit of a New York pizza flare - and who doesn't love a little heat?
- Green Olives or Kalamata Olives - Olives are something that most people love or hate. In our kitchen, everyone's all in on the kalamata olives. They are a delicious briny ingredient that adds an Italian essence that is always a delight. As you'll probably pull these from a jar in the refrigerator, make sure to let them reach room temperature first - they'll cook just a little faster.
- Dates - Did I recommend dates on an authentic Neapolitan pizza dough recipe?? Yep, and trust me, it's worth the exploration. When paired with the red pepper flakes, the spicy-sweet combination is a hit you'll want to try at least once.
- Fresh Onions - How onions roast on a pizza dough cooked under high heat is a definite draw. When chopped at room temperature and seasoned with sea or kosher salt, they add a depth of flavor while not taking away from the authentic pizza flavor.
Equipment
Great pizza dough doesn't require a ton of special equipment. But great pizza dough recipes, like this one based on a preferment biga starter, are much easier with the right tools.
Pizza Oven
This is a critical component that will really dictate how well your pizza dough comes out. If you're using an Ooni pizza oven, a stone is included, so you should be good if you go the high-heat oven route.
If you are using a regular oven, you can use a traditional stone-type baking stone or a cast-iron or stainless steel pizza plate. They both work great in the regular oven, and you'll get the traditional dough rise for your homemade Neapolitan pizza.
Heavy Duty Stand Mixer
I've made pizza dough by hand and some with mixers for many years. Do not make this Neapolitan pizza dough recipe by hand or with a non-heavy-duty stand mixer - get a good stand mixer.
Hand mixing is possible with this recipe, but it will take a very long time, you will be fully exhausted, and you definitely will need two people.
Due to the high-gluten content of the biga pizza dough, the starter is very strong, and a mixer with a small motor will definitely struggle and may even break, especially if you're making a lot of pizza dough.
Pizza Peel
Yep, you must have a floured pizza peel to complete this recipe. There is no way to get your pizza dough into a pizza oven without disaster.
It's worth saying it twice: unless you're using a perforated metallic pizza peel, you must use a floured pizza peel if you want to get the pizza dough off cleanly and into the oven in one piece.
Pizza Cutter
Not a necessity, but definitely a lot of fun to cut your pizzas like the pros.
Clean, Smooth, and Solid Surface
This sounds pretty obvious, but when I first started making pizza dough, a large enough space was something I had to create every time. Remember, a floured surface will need extra room, or you'll have flour everywhere.
Dough Proofing Containers
I have tried numerous ways to proof the pizza dough balls, and there is no better way or easier way than to use a proofing container. It will save you so much time, the results are better, and it is way easier to get each delicate dough ball out without destroying it when you're right at the end of the process.
Save your dough balls from certain doom - get proofing trays.
Storage
- This recipe requires several different storage considerations, and each plays a vital role in making Neapolitan pizza dough successfully.
- You'll need a large bowl that can be sealed airtight with a lid or plastic wrap. The process starts at room temperature, goes in the refrigerator, and returns to room temperature. Keep this in mind when selecting the quality of your containers.
- Once the dough has reached the dough ball stage, they are past the long-term storage option. You can freeze dough balls in this recipe, but it's not ideal. You can freeze the biga portion, but the results are not ideal, and honestly, there's so much investment required in the overall pizza dough recipe timeline that it's not worth it.
- This pizza dough recipe requires dedication, time, much love, and some beer or wine to help past the time never hurt. But, with that warning aside, trust me, this recipe is worth it!!!
Serving Suggestions
This meal can stand independently, but take it over the top with an amazing salad. Our delicious vegan Caesar salad will knock your socks off and impress even the most finicky salad lovers.
Biga Pizza FAQS
Biga and poolish are two different approaches to Neapolitan pizza dough. Biga gives you a chewier texture with more depth in flavor thanks to its stiffer consistency and longer fermentation process. It's like a complex drama movie filled with substance.
Poolish, on the other hand, is more like a bubbly rom-com. It's wetter, leading to a lighter, more open crumb and a milder flavor. The result is a softer crust.
Both have their unique charms, and the choice between them really boils down to personal preference, much like picking a favorite movie genre.
Poolish and Biga, two stars in the world of pre-ferments, each with their own fans.
Poolish is wetter and will give you a lighter, more open crumb with a mild flavor.
Biga, conversely, is drier and imparts a chewier texture with more depth in taste. Think of it like choosing between two different movies: one might be a lighthearted comedy, the other a deep drama. Both have their merits, and the choice really comes down to what you're in the mood for. In the world of pizza, there's room for both!
Using Biga for pizza dough is like giving your pie a superpower! It's a pre-ferment that adds complexity to the flavor and creates a beautiful texture. The longer fermentation process gives a chewy yet airy crust, something that's hard to achieve otherwise. Think of it as investing time in something you love, like a good movie or a woodworking project, to get a result that's just right. It takes patience, but boy, does it pay off when you take that first bite!
Traditional u002200u0022 flour is recommended, but all-purpose flour can work too.
While Biga adds unique characteristics, you can make Neapolitan-style dough without it, though the flavor and texture will differ.
The basic dough is vegan, but the toppings will make it vegan or not vegan-friendly.
Leftover pizza can be refrigerated for up to 3 days in an airtight container and reheated in the oven for best results.
More Delicious Italian-Inspired Vegan Recipes

Have a minute? I'd love for you to dive into the comments and rate this 100% Biga Neapolitan Pizza Dough Recipe. Your feedback is invaluable-did you love it? Did you make any fun twists? Let me know how my directions worked for you so I can keep improving my recipes. Follow me on Pinterest, Instagram, Facebook, and YouTube for inspiration.
Recipe Card
100% Biga Neapolitan Pizza Recipe
Ingredients
Biga Pre-Fermented Dough
- 1000 grams "00" Caputo Pizzeria Flour Blue
- 540 grams water
- 2 grams instant yeast
Pizza Dough
- 100 grams water
- 22 grams salt
- 22 grams diastatic malt Substitute with one tablespoon (or 20 grams) of maple syrup or date syrup
- 10 grams chilled water
Pizza Toppings
- vegan parmesan cheese as desired
- fresh basil as desired
- finely chopped garlic as desired
Pizza Sauce
- 1 can Cento San Marzano Organic Peeled Tomatoes
- 1 tablespoon salt
- 1 tablespoon finely chopped garlic
- 6 leaves fresh basil
- 1 tablespoon olive oil
Instructions
Biga Pre-Fermented Dough
- Combine yeast and water until yeast dissolves.
- Add flour to proofing tray.
- Add water/yeast mixture to proofing tray and lightly combine with fingers. DO NOT kneed the dough, you're going for a disconnected stringy consistency resembling loose noodles.
- Keep mixing until all the dry flour parts are incorporated (this is key as you don't want dry bits remaining in the mixture.
- Place the loose mixer into a bowl or vertical container. DO NOT leave the mixture in a wide container like the proofing tray to rest. Confining the dough in something more narrow will help it to continue combing over the resting period.
- Cover the bowl with plastic wrap or tightly fitting damp towel and rest for 12-14 hours until Biga doubles in size.
- After the resting period, Biga will have wonderful aromatic quality with small air bubbles and somewhat dense consistency.
Pizza Dough
- Combine water and salt, stirring until all the salt is dissolved.

- Place Biga into the stand mixer with a dough attachment.

- Turn mixer on speed setting of 1

- Slowly add water/salt mixture in small increments just until the bottom of the bowl is wet. Once the dough absorbs the water at the bottom of the bowl, repeat the process and continue until all the water/salt mixture is incorporated into the dough.
- Slowly add the malt letting it combine into the dough gradually - DO NOT add all the malt at once.

- Add the chilled water and continue mixing until you have a silky and fully combined dough.
- Remove mixing bowl and cover with plastic wrap or tightly fitting damp towel and rest for 2 hours at room temperature.

- After 2 hours of resting at room temperature, move the bowl the refrigerator to cold rest for another 2 hours.
- Remove dough from refrigerator and rest at room temperature for 15 mins to let it soften.
- Weigh out 320 gram portions shaped into tightly kneaded balls and place into your clean proofing tray and seal tray tightly. You should have ~ 5 pizza balls.
- After 4 hours in the proofing tray, remove pizza balls 1 at a time, by gently using a spatula to separate the balls from each other and the walls of the proofing tray before sliding the spatula underneath the ball to remove.
- After your dough has risen, you'll want to handle it gently to keep those nice air bubbles inside. Instead of using a rolling pin, dust the dough ball with some flour and use your fingertips to gently press and stretch the dough from the center outwards, leaving the very edge a little thicker to create the crust. If you're careful and patient, pushing the dough out evenly without tearing or squishing it, you'll create a crust that's airy and light once it's baked.
- Dress your pizza with the pizza sauce, or use your own, as well as the cheese, garlic, and fresh basil.
- Gently slide, not lift, the pizza onto the pizza peel and give the peel a gentle shake (forward and backward) to ensure it's not sticking to the peel.
Pizza Sauce (can me made in advance)
- Combine 1 can of tomatoes, olive oil, salt, fresh basil, and salt into a blender and mix to desired consistency, usually
- Set aside
Baking in Ooni Pizza Oven
- Preheat pizza oven to ~800 °F to 900 °F for at least
- Transfer the pizza into the pizza oven for to , rotating ¼ turn as the edges of the pizza start to brown.
- Once the pizza is browned, removed pizza using the peel, garnish with any additional topping as desire, slice to your liking and enjoy!
Baking in Home Oven
- Preheat the oven to 500 °F with the pizza stone or pizza plate inside for at least
- Transfer the pizza into the oven for ~ . Check pizza for progress and continue monitoring until cooked. Cooking time will vary based on a number of factors so just keep an eye on it until your happy with the level of browning.
- Once the pizza is browned, removed pizza using the peel, garnish with any additional topping as desire, slice to your liking and enjoy!

Reese says
Way better than restaurant pizza. The Ooni is a great idea.
Regi Pearce says
I'm delighted to hear that you found it even better than restaurant pizza! The Ooni oven can truly take homemade pizza to another level. Thanks for trying it out and for sharing your thoughts. Happy pizza making.
Hailey P says
This was the BEST pizza I have ever had 🙂
Regi Pearce says
Thank you baby girl!