
Sage may be a humble herb, but its flavor packs a punch when fried, turning into crispy fried sage leaves, an aromatic garnish that elevates any dish from great to amazing. In just a few seconds, it adds great visual appeal to soups, pasta, risotto, pizzas, veggies, and more.
")
Do you have an herb garden, or buy those little herb containers, use two leaves, and then watch the rest slowly die in your fridge? Yeah, me too.
This crispy fried sage leaves recipe is incredibly simple yet adds flavor and texture to your dishes. You will use that box of sage, especially for those fall or Thanksgiving meals you want to elevate to be even more special.
Like Air Fryer Croutons, it's a quick and easy garnish that takes your meals to the next level with minimal effort.
Jump to:
Why You'll Love This Recipe
- Takes only a few seconds to fry, making it a fast way to elevate your dishes.
- Frying up sage is a brilliant way to save that fresh sage before it meets its tragic end in the drawer or in your herb garden.
- Adds a burst of earthy, aromatic flavor that complements a variety of meals, especially those favorite fall dishes.
- Fried sage adds a beautiful pop of green to your dish.
Recipe Ingredients
Three ingredients are all you'll need to fry some sage. See the recipe card for details.
")
- Fresh Sage: Use fresh, whole sage leaves.
- Olive Oil: Olive oil adds a subtle flavor, but you can use any neutral, high-heat oil like canola or vegetable oil. Ensure it's hot enough before frying to get that perfect crispy texture by testing a corner of a sage leaf in the oil. If you see bubbles, it's ready.
- Sea Salt: A sprinkle of sea salt, flaky salt, kosher salt, or regular salt is all you need.
- Optional Add-Ins: If you're feeling adventurous, you can infuse the oil with garlic or add a pinch of chili flakes for a little extra kick.
- You can substitute the olive oil with vegan butter.
How To Make Fried Sage
Super easy and quick, it can be ready in less than 5 minutes. See the recipe card for recipe details.

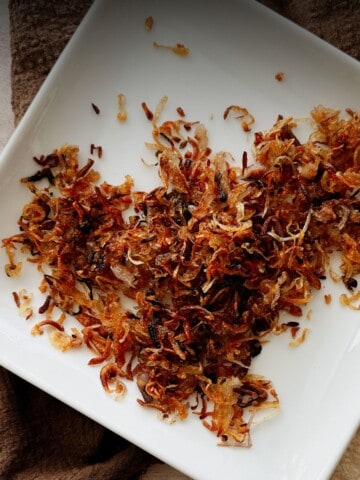
Step 1: Fry the Sage Leaves - Heat olive oil in a small frying pan over medium heat. Carefully place the sage leaves in a single layer in the hot oil. Fry for 30 seconds until they crisp up.

Step 2: Drain and Salt - Remove the leaves with a slotted spoon or tongs, drain on paper towels, and sprinkle with a pinch of salt while still warm.
Top Tips
- Ensure the sage leaves are fresh and completely dry if you wash them before frying to avoid oil splatter and soggy results.
- Sage leaves only need 30 seconds in the oil. Remove them as soon as they turn slightly darker and crisp to avoid burning.
- Fry the sage leaves in small batches to ensure they crisp up evenly and don't overlap in the pan.
- Sprinkle the fried sage with salt while they're still warm to help the seasoning stick.
- Fried sage is best as a garnish, so let its flavor shine by using it sparingly.
- Save the excess oil after it cools down. You know have a sage-infused oil to roast veggies or tofu.
Serving Suggestions
You can leave fried sage in its pretty leaf shape or crumble it up and serve it over your meals. Here are a few serving suggestions.
- Sprinkle fried sage over creamy vegan pasta dishes like Vegan Creamy Pumpkin Pasta or a simple garlic and olive oil spaghetti.
- Garnish pumpkin or Butternut Squash Carrot Soup with fried sage leaves to add a savory crunch.
- Top a rich mushroom or pumpkin risotto with fried sage for an extra layer of texture and flavor.
- Crumble fried sage over a fall-inspired salad like Autumn Pasta Salad.
- Add fried sage to vegan pizza with toppings like roasted garlic, caramelized onions, or mushrooms for a pop of flavor. Try it on Pear and Pistachio Pesto Pizza.

Storage
If you're not using them immediately, let them cool and keep them for up to 2 days in a tightly closed container at room temperature. I like to place a dry paper towel in there too. However, you'll get the best results when used right away.
Recipe FAQS
If your sage leaves taste bitter, it's likely because they were over-fried. Remove them as soon as they become crispy, and don't heat them on too high a temperature.
While salt is the classic choice, you can experiment with pepper, smoked paprika, or even a fun salt like truffle oil-infused sea salt for a different flavor twist.
Make sure the leaves are completely dry before frying. Also, don't crowd the pan, and remove them promptly once they crisp up.
Yes, you can fry them in advance. I leave them on the counter on a plate lined with a paper towel until I'm ready to use them. Any longer, and I keep them for up to 2 days in a tightly closed container at room temperature with a dry paper towel. However, you'll get the best results when you use it right away.
Crispy sage leaves are a classic garnish for butternut squash soup, pasta (especially brown butter pasta), risotto, gnocchi, and roasted vegetables. They add a nutty, aromatic crunch that elevates even the simplest dish.
Yes! For the oven, spread dry sage leaves on a baking sheet, brush lightly with oil, and bake at 375°F for 5-7 minutes until crisp. For the air fryer, air fry at 350°F for 3-4 minutes (air fryers vary, so check often). The stovetop method is fastest and gives the most even crispness.
More Recipes You'll Love

Recipe Card

Crispy Fried Sage Leaves
Equipment
Ingredients
- 10 fresh sage leaves or as many as you want to fry
- ¼ cup olive oil or other high-heat oil; enough to cover the bottom of a small pan
- 1 pinch sea salt to taste
Instructions
- Prepare the Sage: Gently rinse the sage leaves if needed. Pat them completely dry with a paper towel. Make sure they are fully dry, as wet leaves can cause the oil to splatter.
- Heat the Oil: In a small skillet, heat the olive oil over low-medium heat. You want the oil hot but not smoking. To test, dip the edge of a sage leaf into the oil-if it bubbles, you're good to go.
- Fry the Sage Leaves: Working in batches if necessary, carefully place the sage leaves in the hot oil. Fry for about 30 seconds per leaf. They should quickly crisp up and turn a slightly darker green but not burn.
- Remove and Drain: Using a slotted spoon or tongs, carefully transfer the fried sage leaves to a plate lined with paper towels to drain the excess oil.
- Season: While the leaves are still warm, sprinkle them with a pinch of sea salt for extra flavor.


Shannon says
I had never seen these done but I saw your post on pinterest and thought they looked so nice on the butternut soup, I tried it and it was super easy and gave a nice presentation for my inlaws which are vegetarian. Thanks!
Regi Pearce says
That’s so awesome to hear! I’m so glad you gave the fried sage a try—it really does add that extra touch to soups, especially for special guests like your in-laws! And bonus points for impressing the vegetarians too! Thanks for letting me know.